
How to Build a Wooden Garden Bed That Actually Lasts
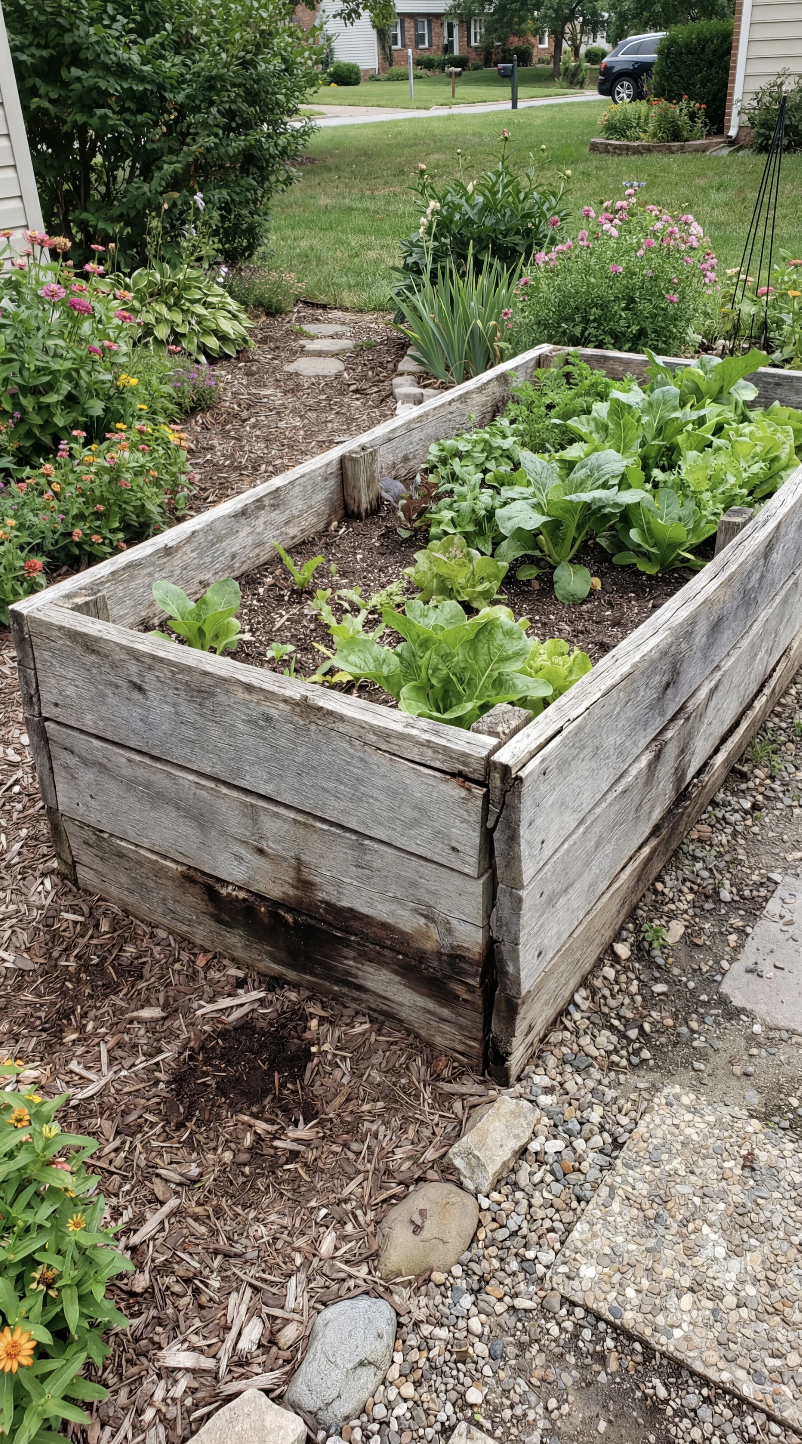
A lot of wooden garden beds look great for one season. Then the boards start bowing. The corners loosen. The bottom edges soften from moisture. Within a couple of years, you are either rebuilding it or pulling it apart and starting over.
That is not because raised garden beds are a bad idea. It is because most of them are built without thinking about moisture, soil pressure, and wood movement. The good news is that building a wooden garden bed that lasts for years is not complicated. You just need to make a few smart decisions up front about materials, size, and construction. This guide walks you through a simple, durable design that balances longevity, cost, and ease of building. No fancy joinery. No custom milling. Just a garden bed that works.
Why Most Wooden Garden Beds Fail Early
Before building anything, it helps to understand why so many garden beds fall apart.
The biggest reasons are:
untreated wood sitting directly on soil
boards that are too thin for the height
long spans without support
fasteners that rust or loosen
trapped moisture
Soil is heavy. Wet soil is even heavier. When you fill a raised bed, the pressure pushing outward on the boards is constant. If the boards are thin or poorly supported, they bow. If moisture sits against the wood, it rots. A lasting garden bed accounts for those forces from the start.
Choosing the Right Size (This Matters More Than You Think)
The most common mistake people make is building garden beds that are too wide.
A good rule of thumb is:
4 feet wide maximum
This allows you to reach the center of the bed from either side without stepping into the soil. Stepping into the bed compacts the soil and defeats the purpose of raised gardening.
Length is flexible, but for strength and simplicity:
6 to 8 feet long is ideal
Anything longer than 8 feet should have additional bracing.
Height depends on what you plan to grow and how much bending you want to do.
Common heights:
10 to 12 inches: good for shallow-root plants
16 to 18 inches: ideal for most vegetables
24 inches: comfortable working height, more soil volume
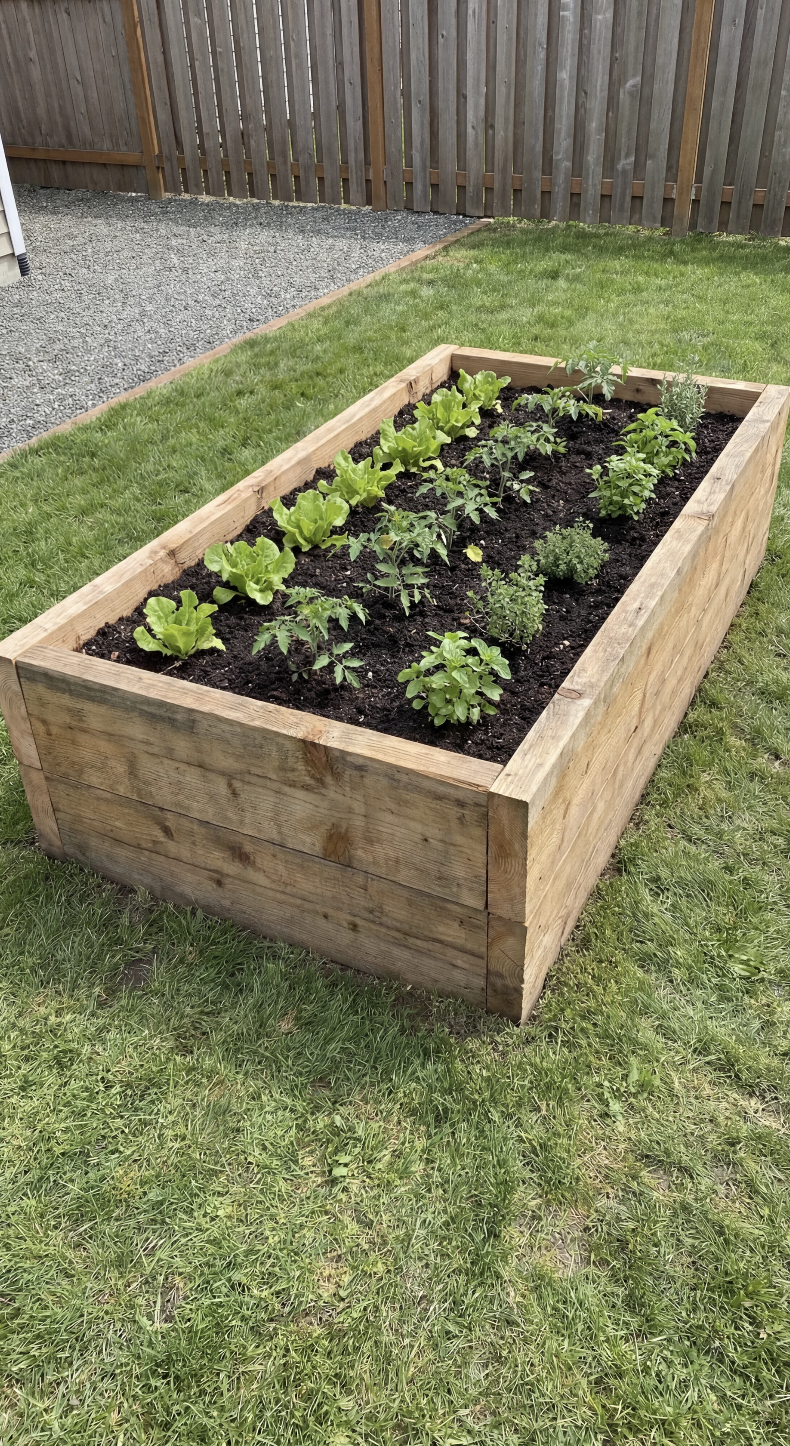
For most homeowners, 16 inches tall is the sweet spot. It provides good root depth without requiring excessive lumber or soil.
Recommended Garden Bed Dimensions
For this build, we will use a 4 ft x 8 ft x 16 in raised garden bed.
Finished outside dimensions:
Length: 96 inches (8ft)
Width: 48 inches (4ft)
Height: 16 inches
This design uses two stacked boards per side.
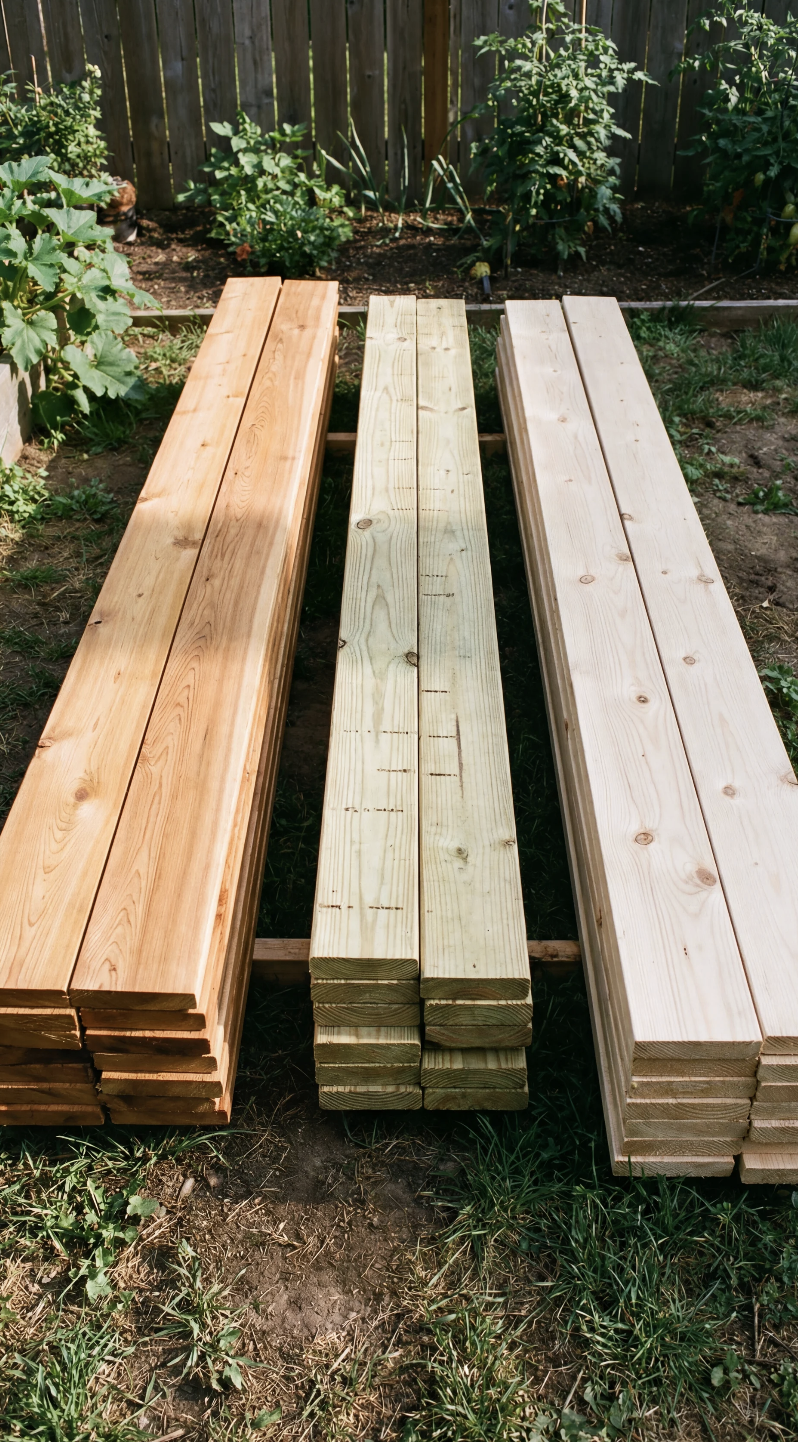
Choosing the Right Wood (Longevity vs Cost)
You have a few good options for outdoor garden beds.
Cedar (Best Overall)
Cedar is naturally rot-resistant and holds up well outdoors without chemical treatment.
Pros:
long lifespan
lightweight
looks good naturally
Cons:
higher cost
If budget allows, cedar is the best choice.
Pressure-Treated Lumber (Modern, Ground-Rated)
Modern pressure-treated lumber rated for ground contact is safe for garden use and very durable.
Pros:
affordable
long lifespan
widely available
Cons:
heavier
not as attractive
This is a practical choice if cost matters more than appearance.
Untreated Pine (Not Recommended)
Untreated pine will rot quickly when in contact with soil and moisture. It is fine for temporary builds but not for something you want to last.
Lumber Cut List
For a 4x8 garden bed, using 2x8 boards (actual height ~7.25 inches):
2 pieces at 96 inches (long sides)
2 pieces at 96 inches (long sides, second row)
2 pieces at 45 inches (short sides, inside fit)
2 pieces at 45 inches (short sides, second row)
Why 45 inches instead of 48?
Because the short boards fit between the long boards. Two 2x boards add about 3 inches total thickness.
This creates a stronger box and cleaner corners.
Fasteners Matter More Than You Think
Use exterior-rated deck screws. Not drywall screws. Not interior wood screws.
Recommended:
3 inch exterior deck screws
coated or stainless steel
These resist rust and hold up to outdoor moisture.
Building the Box (Simple and Strong)
Start by laying out the bottom row.
Place the two 96-inch boards parallel on the ground.
Fit the 45-inch boards between them to form a rectangle.
Pre-drill pilot holes to prevent splitting.
Drive screws through the long boards into the ends of the short boards.
Once the first layer is square and tight, stack the second row directly on top.
Stagger joints if possible, but in a simple box like this, stacking directly works fine as long as everything is tight.
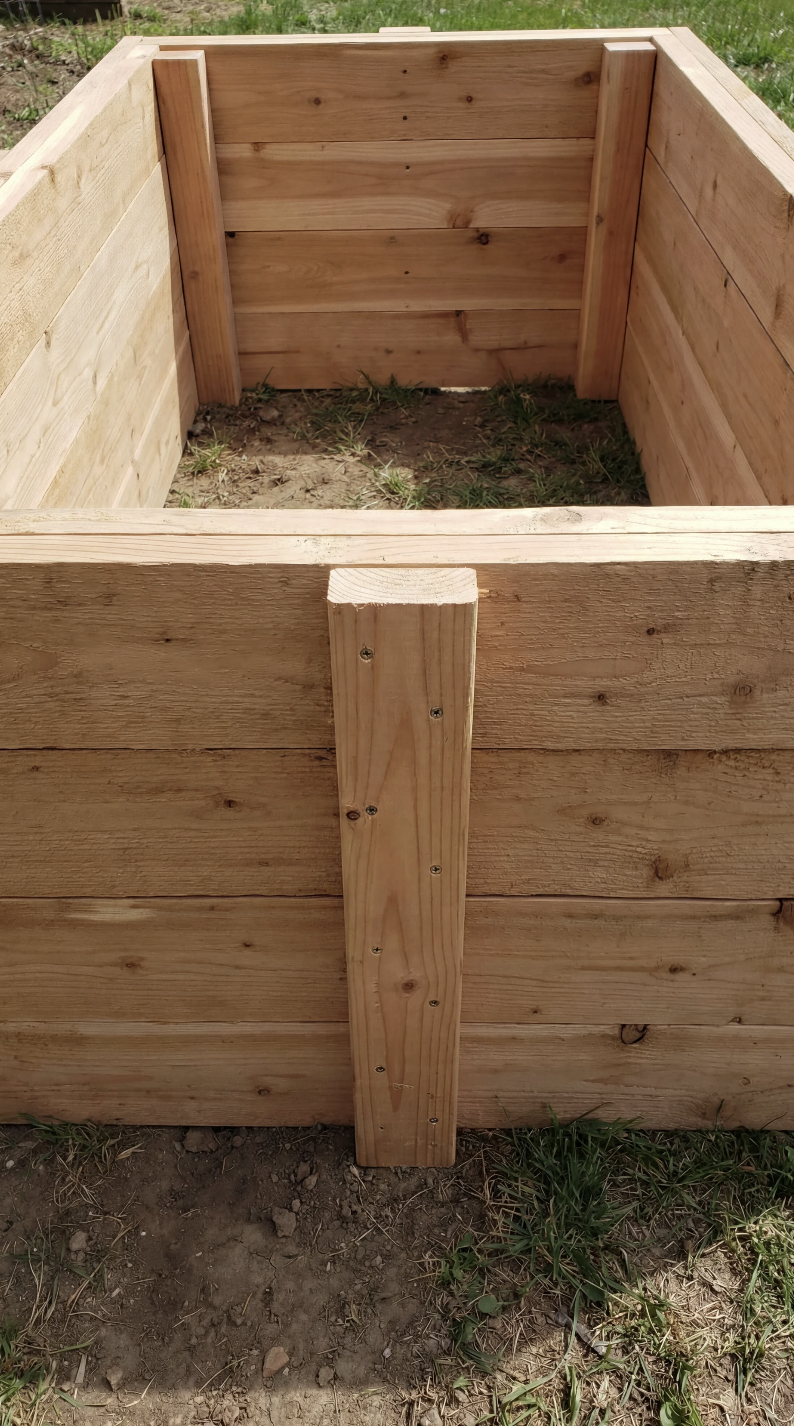
Add Internal Bracing (This Is What Most People Skip)
For an 8-foot-long bed, internal bracing prevents bowing.
Add:
1 vertical brace centered on each long side
Use a scrap piece of 2x lumber cut to 16 inches and fasten it inside the bed, flush with the top edge.
This brace pushes against soil pressure and keeps boards straigt.
Should You Use a Liner?
This is where opinions vary. Do NOT fully wrap the interior in plastic. That traps moisture against the wood and accelerates rot.
If you want protection:
line only the inside faces with landscape fabric
staple it lightly
Landscape fabric allows drainage while reducing constant soil contact against the wood. Avoid plastic sheeting.
Ground Contact and Drainage
Place the bed on:
compacted soil
gravel
or existing grass
Avoid setting it on concrete unless you add drainage holes at the bottom edge. If rodents are a concern, laying galvanized hardware cloth on the ground before setting the bed adds protection.
Filling the Bed (Quick Tip)
A full 4x8x16-inch bed requires a lot of soil.
A simple approach:
bottom third: branches, leaves, or coarse organic material
top two-thirds: quality garden soil mix
This reduces cost and improves drainage.
Simple Maintenance That Extends Life
Once built, maintenance is minimal.
Each season:
check screws and tighten if needed
look for signs of standing moisture
keep mulch from piling against the outside walls
If using cedar, letting it weather naturally is fine. If using pressure-treated lumber, no sealing is required.
Final Thoughts
A wooden garden bed does not need to be complicated to last. The key is respecting what you are building. Soil is heavy. Moisture is constant. Wood moves. By choosing the right dimensions, using appropriate materials, and adding a little bracing, you build something that works year after year without needing constant repair.
Build it once. Use it often. Let it do its job. That is what a good DIY project should feel like.